Jun, 2015
Mandrill RVE Handler
Table of Contents
What is an RVE Handler?
RVE (Replies via Email). An RVE Handler is an integration between Comment Mail and another third-party service, such as Mandrill. Mandrill becomes your RVE Handler, but the entire process is not completed until it reaches a final integration that is powered by Comment Mail. Where Comment Mail is a WP plugin that you've installed on your site, which receives and processes replies.
When someone replies to an email notification sent by Comment Mail, the email first goes to Mandrill, and is then routed back to your installation of WordPress, where Comment Mail receives a Webhook data transmission and processes it accordingly. This makes it possible for Comment Mail to process email replies and convert them into comments in a very reliable way.
Steps Required
This feature is intended for intermediate to advanced site owners; i.e., it's not super-simple, but if you follow these instructions it's not difficult either. Your visitors will thank you for the time you spend here :-) Particularly those who use mobile devices; i.e., replying via email is so much easier.
1. Get a Mandrill Account
Note: Mandrill is no longer a free service. When this article was first written, Mandrill was a free service, however this service has since been rolled into MailChimp. Mandrill is now a transactional email API for MailChimp users and there is a cost involved.
Mandrill does many things. Inbound Mailbox Routes are but one feature they offer. Just create a Mandrill account, skip straight to your Inbound Mailbox Routes and don't worry about the rest for now. You can signup for an account here: https://mandrill.com/signup/
2. Choose a Domain to use w/ Mandrill
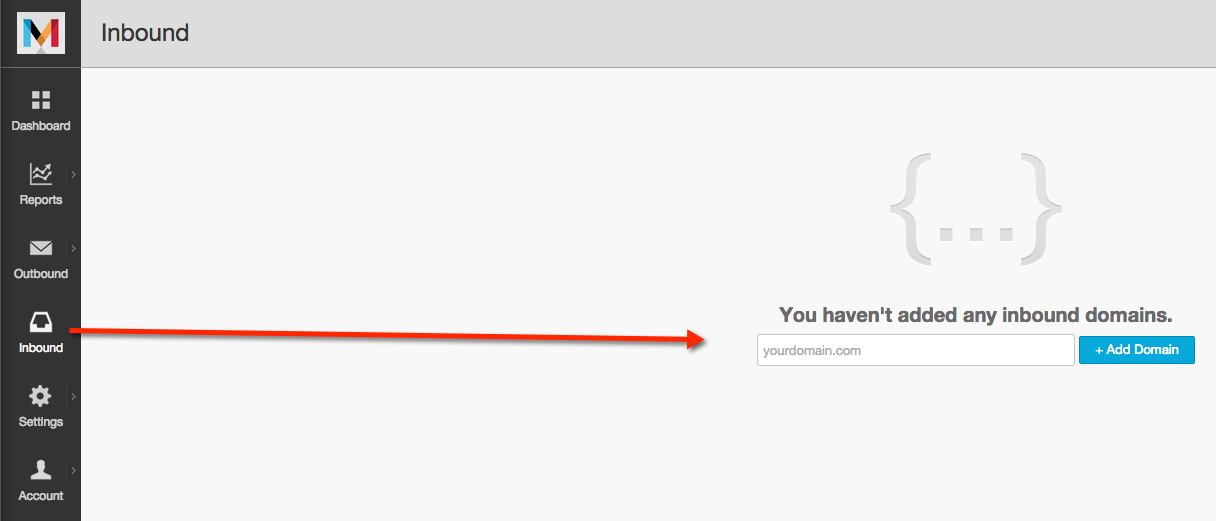
I suggest using a sub-domain that is specifically for Mandrill; e.g. mandrill.mysite.com. This sub-domain needs to exist, so please create it now. You will need to setup MX records in the next step also. So, decide on the domain name that you will use, and add it to your Mandrill account. In this example, I'll choose mandrill.websharks-inc.com.
Here are a couple of screenshots (click to enlarge)
3. Creating MX Records
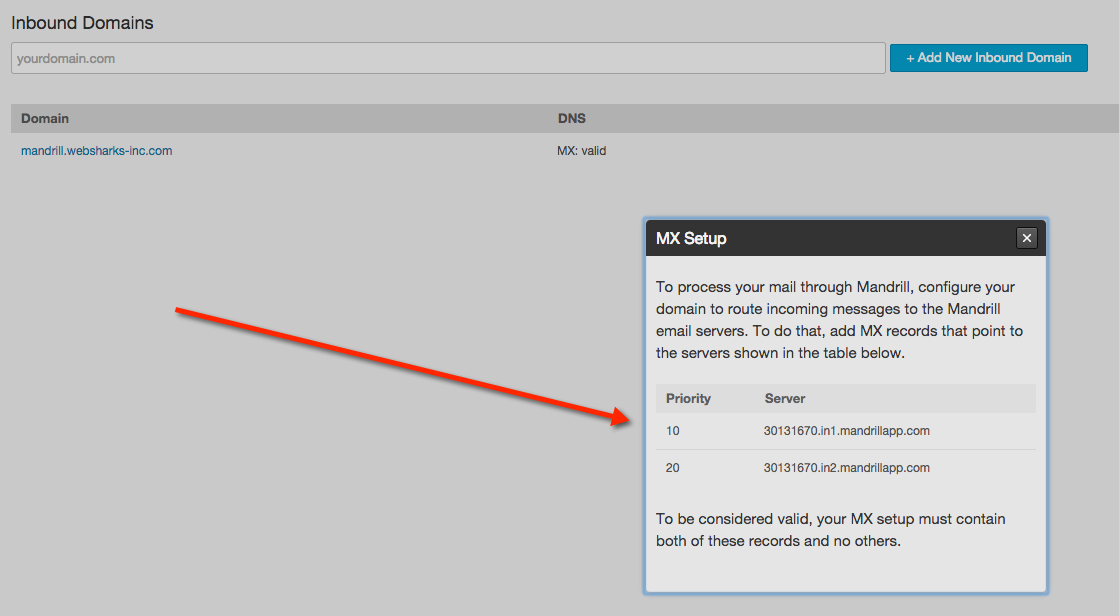
MX records are for email routing. You will need to click the button that reads, "DNS Settings" and update your DNS records for the domain that you added to your Mandrill account. Mandrill provides you with the MX records that are needed. You just need to create those records for the domain that you decided to use with Mandrill.
Again, it is best to use a sub-domain that is specifically for Mandrill, so as to avoid any interruptions with your existing domain. In the end, this domain is only used for Reply-To headers anyway, so it really doesn't need to look pretty; it just needs to work :-)
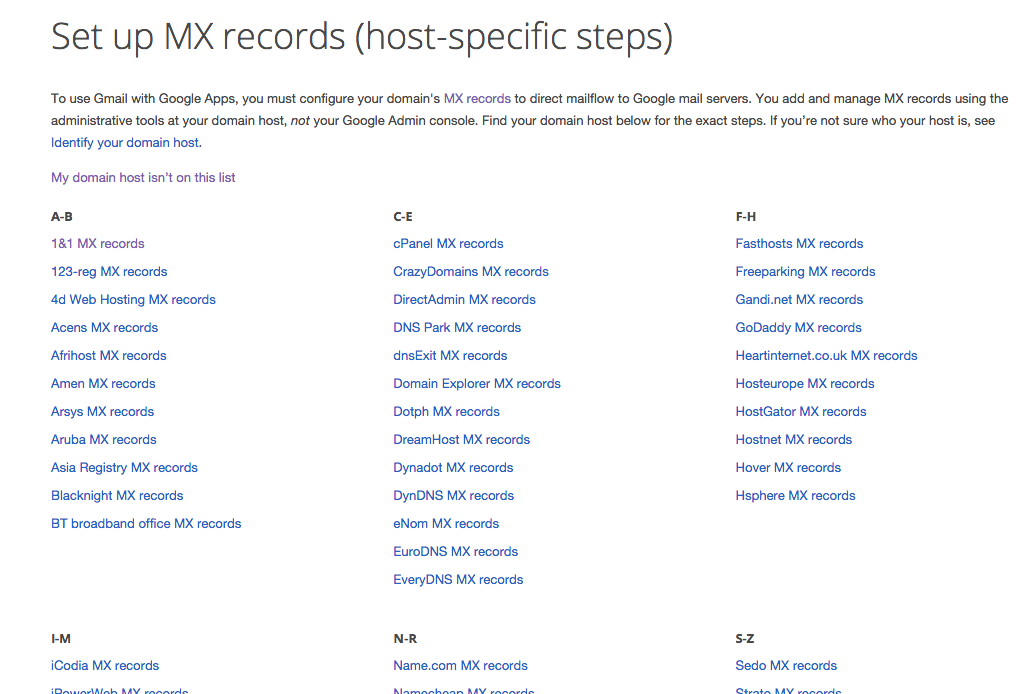
If you're not sure how to change MX records given your current registrar or hosting provider, you might take a quick peek at the list that has been compiled by Google. See: https://support.google.com/a/topic/1611273 Obviously, the instructions provided by Google are for Google MX records, but if you're totally lost, finding your current registrar or hosting provider in this list and going by example should help. Instead of using Google MX records, just follow the instructions and then use the MX records provided by Mandrill instead. The screenshot above shows where to find the MX records that are provided by Mandrill.
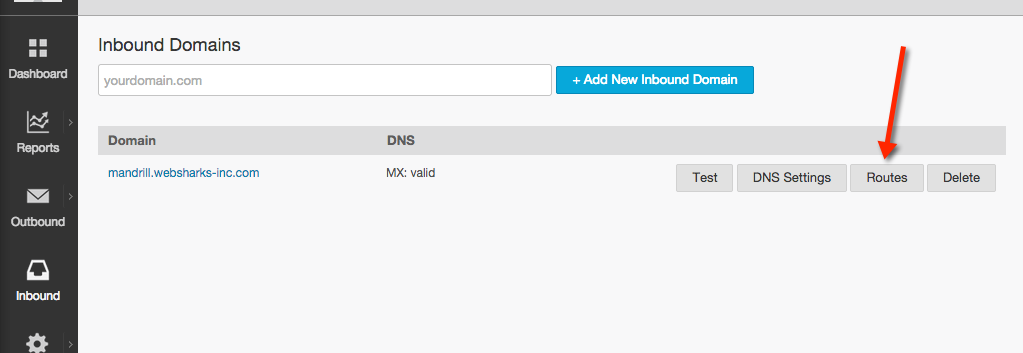
4. Create an Inbound Mailbox Route
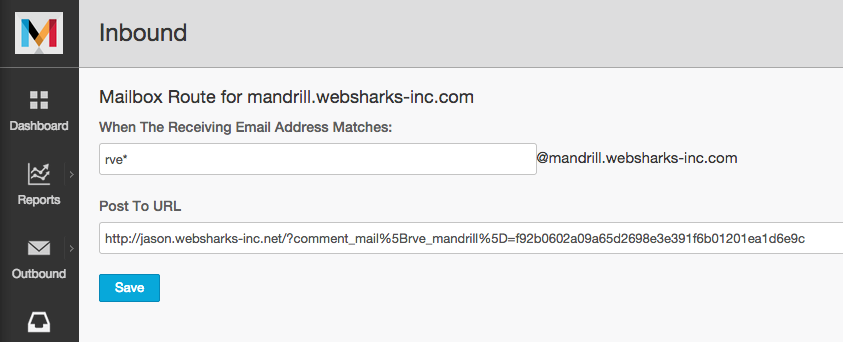
For the domain that you added to your Mandrill account, find and click the button that reads, "Routes"; as seen in the attached screenshot. This is the most important part, because you need to get the "Route" setup correctly, so that it points to your Comment Mail Webhook that's running on your installation of WordPress.
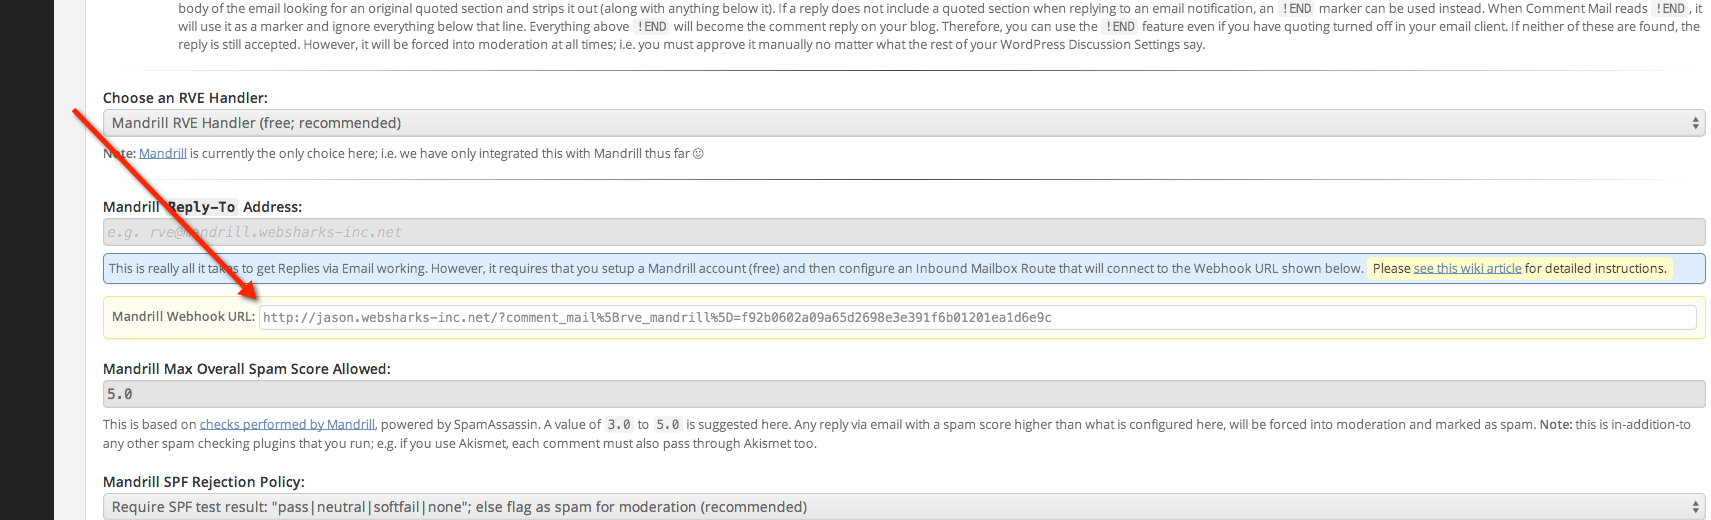
Before you can create the necessary Route, you will need to locate your Mandrill Webhook URL, provided by Comment Mail. This can be found inside your WP Dashboard under the "Replies via Email" section in your Comment Mail Options. Here's a quick screenshot of that area in the WP Dashboard.
Now come up with a mailbox name that you prefer. I'll use something very short in this example: rve. Note: it's IMPORTANT that you create the route with a wildcard * character on the end. For instance, if the mailbox name that I choose is rve, my Route should be created with rve*. This allows for rve+[details]@ to be added by Comment Mail, so that replies via email will work properly even with + plus addressing, which is something that Comment Mail uses extensively.

Map this route to your Mandrill Webhook URL, provided by Comment Mail.
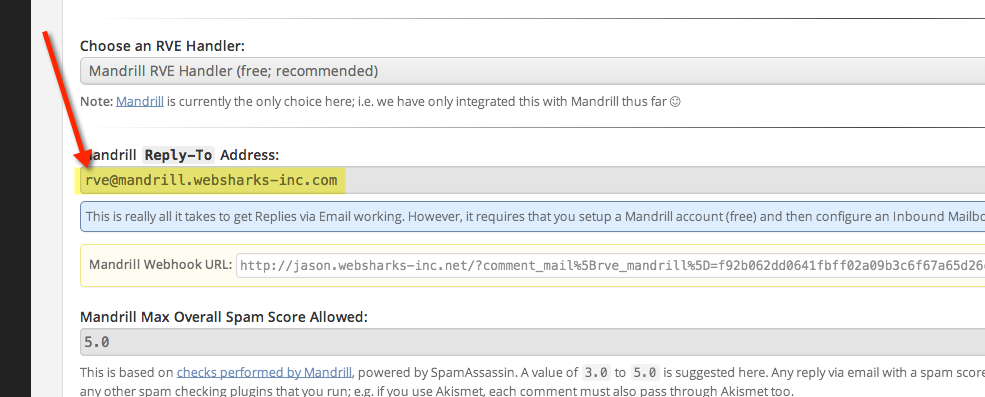
5. Give your Route to Comment Mail
Tell Comment Mail what address that you chose, and then save your Comment Mail options.
Replies via Email are Now Enabled ~ Congrats!
When an RVE Handler is Enabled
Comment Mail™ will allow replies to comments via email using a special
Reply-Toaddress that you will need to set up by following the instructions provided in this article. Any other Reply-To address configured elsewhere in Comment Mail will be overridden by the address you configure for an RVE Handler. There are no special exceptions to this. An RVE Handler takes precedence over any otherReply-Toyou configure.Replies to comments via email will be functional for all types of notifications sent by Comment Mail (including digest notifications). However, there are a few things worth noting before you enable an RVE Handler.
All replies posted via email must be sent to the special
Reply-Toaddress that you configure. Once you configure aReply-Tofor an RVE Handler, Comment Mail will automatically set theReply-To:header in all email notifications that it sends. This way when somebody replies to a comment notification, their email program will reply to the address required for replies via email to work properly.The
Reply-Toaddress that you configure, will serve as a base for Comment Mail to work from. For instance, let's say you choose:[email protected]. This base address will be suffixed automatically (at runtime) with details specific to a particular notification that Comment Mail sends. Ultimately,[email protected]will look like:[email protected].
In this example, the additional details (following the
+sign) are there to help Comment Mail route the reply to the proper location, and to provide a means by which to identify the end-user that is posting a reply.For single-comment notifications; i.e. where a subscriber chooses delivery type
asap(aka: instantly), there is just a single comment in each notification that a subscriber receives. This works best with replies via email, since theReply-To:header (on its own) is enough for everything to work as expected. Someone replying via email need only hit the Reply button in their email program and start typing. Very simple.For multi-comment notifications; i.e. where a subscriber chooses a delivery type that is not
asap(e.g.hourly,daily, etc.); there can be more than a single comment in each notification they receive. If there is more than one comment in the notification, instructions will be provided to the end-user explaining how to reply. The specialReply-Toaddress is still used in this case. However, they also need to specify which comment they want to reply to. To do this, the end-user must start their reply with a special marker provided by Comment Mail. Again, if there is more than one comment in the notification, instructions will be provided to the end-user explaining how to reply.Comments posted via email are still piped through the same underlying WordPress handler that normal on-site comments go through (i.e.
/wp-comments-post.php). This means that all of your existing WordPress Discussion Settings (and/or Akismet settings) will still apply to all comments, even if they are posted via email.
With one exception. When an RVE Handler is enabled, any comments posted via email are allowed through without an end-user being logged-in. If your WordPress Discussion Settings require that users be logged-in to post comments, that will be overridden temporarily whenever a reply via email comes through.
Please note that replies posted via email are generally from confirmed subscribers. Any reply via email that is not from a confirmed subscriber will be forced into moderation by Comment Mail anyway. Otherwise, whatever your current Discussion Settings are configured to allow, will be adhered to for replies via email also.
For instance, if you require that all comments be moderated, that will continue to be the case for all replies via email. Comment Mail will never approve a comment on it's own. Approval of comments is always determined by your WP Discussion Settings.
- Any reply via email should include one of two things. A copy of the original quoted notification, or a special
!ENDmarker. Most email clients will include the original message in an email reply, and this is what Comment Mail will look for. Comment Mail scans the body of the email looking for an original quoted section and strips it out (along with anything below it). If a reply does not include a quoted section when replying to an email notification, an!ENDmarker can be used instead.
When Comment Mail reads
!END, it will use it as a marker and ignore everything below that line. Everything above!ENDwill become the comment reply on your blog. Therefore, you can use the!ENDfeature even if you have quoting turned off in your email client.If neither of these are found, the reply is still accepted. However, it will be forced into moderation at all times; i.e. you must approve it manually no matter what the rest of your WordPress Discussion Settings say.